
How to Connect an API to a Website
Understanding what an API is, conceptually, is one thing. Actually wiring one into a real website, so that a button click genuinely triggers a payment, or a form submission genuinely sends a WhatsApp message, is a different, more practical skill, and it is the point where a lot of beginners stall, not because the idea is hard, but because nobody walked them through the actual sequence of steps in order. This guide is that sequence, written for someone who understands the concept from our earlier guides to what an API is and how REST APIs work and is ready to actually connect one to a real, live website.
Step 1: read the documentation properly before writing any code
This sounds obvious and is skipped constantly. Before touching your editor, find the specific documentation page for the exact thing you are trying to do, not the general overview page, the specific endpoint, note the address, what information it needs, what it sends back, and whether it needs authentication. Look specifically for a working example request and response, since a concrete example clarifies far more than an abstract description, and most good documentation includes one directly.
Step 2: get your API credentials, and understand test versus live mode
Almost every API that does anything meaningful requires you to sign up for an account and obtain credentials, usually an API key, sometimes a pair of keys, a public one and a secret one. Payment and messaging APIs in particular almost always offer separate test and live credentials: test credentials let you make real requests against a safe, simulated version of the system, no real money moves, no real messages send, while live credentials do the real thing. Always start with test credentials, and build the habit of checking, before every deployment, which set of credentials your code is actually configured to use, since accidentally shipping test credentials to a live site, or live credentials into a public test, are both common and both genuinely costly mistakes.
Step 3: never put credentials directly in your website's code
This deserves its own step because it is the single most consequential mistake beginners make. An API key typed directly into a file that gets uploaded to your website, especially the part of your website that runs in a visitor's browser, is visible to literally anyone who looks at your page's source code, and a key typed into a file that gets pushed to a public code repository is visible to anyone, including automated scanners that actively search public repositories for exactly this pattern, often finding and abusing exposed keys within minutes.
The correct approach is environment variables, or your platform's equivalent secrets management: your API key is stored separately from your actual code, in a configuration your server reads at startup, never written directly into a file that gets shared, committed to version control, or shown to anyone else. Every serious hosting platform and framework provides a straightforward way to do this, and taking the ten minutes to set it up properly from the start is meaningfully cheaper than dealing with a leaked key later.
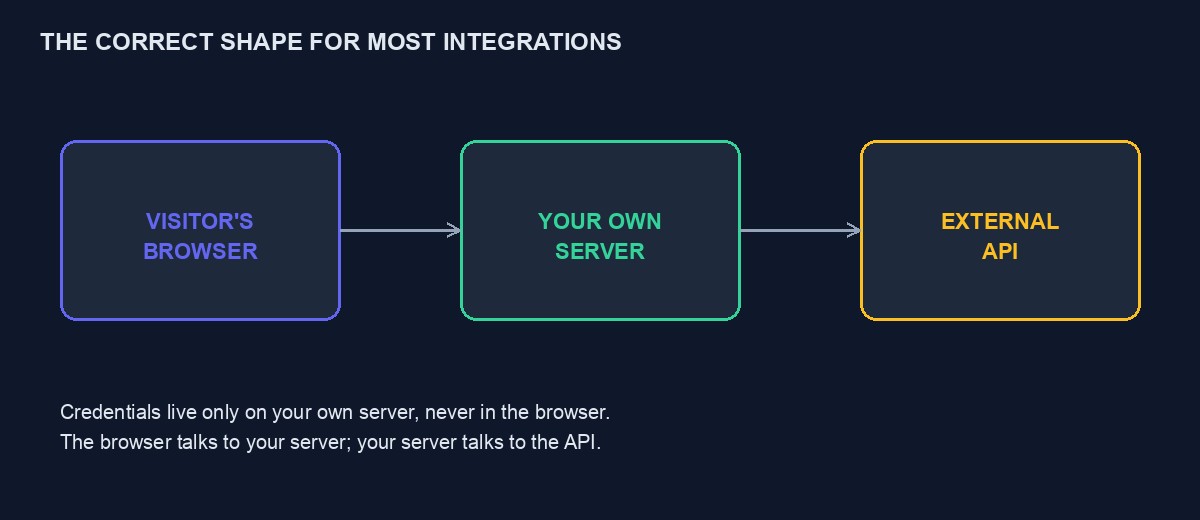
Step 4: decide whether the request happens on the server or in the browser
This is the single most important architectural decision in connecting an API to a website, and it is worth understanding clearly rather than guessing. A request made directly from a visitor's browser, using JavaScript running on the page they are looking at, is visible to that visitor, including any credentials included in it, which means browser-side requests are only appropriate for public, non-sensitive information, and only when the API itself is specifically designed to be called this way, usually with a public key that carries limited permissions by design.
For anything sensitive, taking a payment, sending a message, reading or changing private data, the request must be made from your own server, not the visitor's browser. Your website's backend, running on your own infrastructure where credentials stay genuinely private, makes the actual API request, and only sends the visitor's browser the result it is actually allowed to see. This pattern, browser talks to your own server, your own server talks to the external API, is the correct shape for the overwhelming majority of real integrations, and skipping it in favour of calling a sensitive API directly from the browser is a common and serious security mistake.
Step 5: build and test the request in isolation first
Before wiring an API call into your actual website's button or form, get it working entirely on its own, using a tool like Postman or a simple standalone script, confirming you can successfully send a request and receive the expected response using your test credentials. This isolates two different categories of problem that are much harder to debug when tangled together: is the API integration itself correct, and separately, is my website's code correctly triggering and using that integration. Solving the first in isolation, before touching your website's actual code, saves real time later.
Step 6: wire it into your website's actual flow
With a confirmed, working request in isolation, now connect it to the real trigger, a form submission, a button click, a scheduled task, on your server. Your server-side code receives the trigger, makes the API request using your safely stored credentials, and handles both the success case and the failure case explicitly, since a request can fail for many reasons, invalid input, the external service being temporarily down, a rate limit being hit, and your website needs to show the visitor something sensible in every one of those cases, not just the happy path you tested first.
Step 7: handle errors like a real feature, not an afterthought
A common beginner pattern is building the success case carefully and leaving error handling as a vague, generic "something went wrong" message, or worse, no handling at all, letting a failed request crash the page or leave a visitor stuck with no feedback. Treat error handling as seriously as the main feature: check the status code, as covered in our REST API guide, read any error message the API provides, and translate it into something a real visitor can actually understand and act on, "your card was declined, please try a different payment method" rather than a raw technical error message that means nothing to them.
Step 8: if the API sends webhooks, set up and verify that endpoint too
Many real integrations, especially payments, are not complete with just an outgoing request. You also need to receive incoming confirmation, through a webhook, as covered in our dedicated guide to what a webhook is. Set up your webhook endpoint, verify its signature properly, and test it thoroughly using the service's test mode before considering the integration finished, since an integration that can send a payment request but never properly confirms whether it actually succeeded is only half built.
Step 9: test the whole thing end to end, including failure cases deliberately
Once wired together, test the complete flow as a real visitor would experience it, not just the code in isolation. Submit the form with valid data and confirm success. Then deliberately try to break it: submit invalid data, use a test card designed to simulate a decline, disconnect your internet mid-request if you can simulate it, and confirm your website handles every one of these gracefully rather than only working when everything goes perfectly, which is rarely how real usage actually goes.
Step 10: switch to live credentials deliberately, and watch closely at first
Only once you have genuinely tested the whole flow, success and failure cases, in test mode, switch your configuration to live credentials, ideally through a deliberate, reviewed change rather than an accidental one. Watch the first real transactions closely, checking that webhooks arrive correctly and records update as expected, rather than assuming everything that worked in test mode will behave identically the moment real money or real customer data is involved.
A worked example, start to finish: a contact form that sends a real email
To make the ten steps concrete, walk through them for a genuinely common, simple integration: a contact form on a business website that sends an email notification when a visitor submits it, using an email-sending API rather than the website's own server trying to send email directly, which is unreliable and frequently gets flagged as spam without proper setup.
Reading the documentation for a typical email API reveals a single relevant endpoint, something like /send, that needs a sender address, a recipient address, a subject, and a message body, authenticated with an API key. Signing up provides both a test key, which does not actually deliver mail but confirms the request was well-formed, and a live key. That key goes into an environment variable on the server, never into the actual website files. Testing the request in isolation, using Postman with the test key, confirms a correctly formed request returns success. Wiring it into the actual website means: the form submission goes to the website's own server, not directly to the email API, the server reads the submitted name, email and message, constructs the API request using the safely stored key, and sends it. If the email API returns an error, the visitor sees "Something went wrong sending your message, please try again or contact us directly at this phone number," not a raw technical error, and not silence. Testing end to end includes deliberately submitting an empty form, an absurdly long message, and a message with unusual characters, confirming each is handled sensibly rather than only testing the one polite example that was used during development. Only once all of this behaves correctly does the live key replace the test key, and the first few real submissions are watched closely to confirm real emails actually arrive.
CORS: the confusing error almost every beginner hits at least once
If you ever attempt to call an external API directly from a browser rather than from your own server, and specifically if that API was not designed to be called this way, you will likely encounter an error mentioning CORS, Cross-Origin Resource Sharing, and it is worth understanding what this actually is rather than treating it as an arbitrary obstacle to work around by any means necessary. CORS is a deliberate browser security feature that stops a webpage from one website silently making requests to a completely different website on a visitor's behalf without that other website's explicit permission, which prevents a whole category of attack where a malicious page quietly acts on your behalf against sites you are logged into elsewhere.
When you hit a CORS error, it usually means you are attempting to call an API directly from the browser that was never designed to be called that way, and the fix is almost never to find a workaround that bypasses the browser's protection, that protection exists for good reason. The fix is routing the request through your own server instead, exactly the pattern described in Step 4 above: your server, which is not subject to this particular browser restriction, makes the request to the external API, and your browser only ever talks to your own server. Encountering a CORS error is often, in practice, a useful signal that your architecture had accidentally drifted into calling something directly from the browser that should have gone through your own server from the start.
Handling rate limits gracefully in a real website
If your website makes API requests in response to real visitor actions, and enough visitors act at once, you may eventually encounter the rate limit covered in our REST API guide, a 429 status code telling you to slow down. A website built without any thought for this simply fails visibly the moment it happens, showing an error to whichever visitor happened to trigger the limit. A more resilient approach queues requests during a burst, retries automatically after a brief pause when a rate limit response is received, and only shows a visitor an actual error after genuine, repeated failure, rather than on the very first sign of temporary congestion. This matters more the more successful your website becomes, since rate limits are, by definition, a problem that only appears under real, meaningful traffic.
Caching: not making the same request more than you need to
Not every API request needs to happen fresh every single time a visitor loads a page. If your website displays something that changes rarely, a list of available data plans, exchange rates that update once a day, requesting it fresh from the external API on every single page load is wasteful, slower for your visitors, and needlessly increases how close you sit to any rate limit. Storing, or caching, a copy of that response for a sensible period, and only requesting a fresh copy periodically or when you know it may have changed, is both faster for visitors and gentler on the API you depend on. This matters less for things that must always be current, an actual payment's live status, and matters considerably for anything that is genuinely fine being a few minutes or hours old.
A common mistake worth naming specifically: mixing up which side does what
A pattern that catches out many beginners building their first integration: building a request that works when tested directly, then wiring it into the website in a way that accidentally runs it in the visitor's browser instead of on the server, often because a tutorial or example code was written for a different context and copied without adjusting for this specific distinction. If your API requests seem to work in isolated testing but exposed credentials show up in your browser's developer tools once wired into your actual site, this is almost always the cause, and the fix is moving that specific piece of code to run on your server instead.
A ten-step quick reference
Read the documentation properly. Get test credentials before live ones. Never put credentials directly in your code. Decide server-side versus browser-side correctly, defaulting to server-side for anything sensitive. Test the request in isolation before wiring it into your site. Connect it to the real trigger. Handle errors as seriously as the success case. Set up and verify any webhook the API sends. Test end to end, including deliberate failure cases. Only then switch to live credentials, deliberately and watched closely. Each step is simple individually; skipping any one of them is where real integrations go quietly wrong, usually discovered at the least convenient moment rather than during calm, deliberate testing.
A closing thought on where the real risk lives
Nearly every serious mistake covered in this guide, an exposed credential, a sensitive request made from the browser, an unhandled error, an unverified webhook, is invisible during casual, happy-path testing and only becomes visible once something goes slightly wrong or someone deliberately looks for the gap. This is precisely why the discipline of testing failure cases deliberately, not just the success path, matters as much as it does: the integration that looks finished after a single successful test run is often the one with the most to still discover.
How this looks on our own platform
If you are building a custom feature on top of a project hosted with us, our developer documentation covers exactly this: real, working per-project API keys, meant to be used from your own server-side code, never from a visitor's browser, plus payment webhooks already built and verified for you when using our own payment gateway connections, and the VTU public API for anything involving airtime, data or bill payment integrations. For most site types, business websites, stores, booking sites, you never need to build this connection yourself at all, since the payment and messaging integrations are already wired in and tested; this level of detail matters most if you are building something genuinely custom on top of what the platform already provides.



Comments
No comments yet. Be the first to share your thoughts.