
Paystack API Tutorial
This is a practical, technical walkthrough of integrating Paystack's API directly, written for a developer who has read our general guides to what an API is and how REST APIs work and now wants to actually wire up real payments. If you are running a store, VTU platform or booking site on our own platform, this level of detail is handled for you already, connecting your own Paystack account from your project settings is all that is required, and this tutorial is for anyone building something custom, or simply wanting to understand what is happening underneath.
Getting your API keys
After creating a Paystack account, your dashboard provides two pairs of API keys: test keys, for building and testing without moving real money, and live keys, for real transactions once you have completed business verification. Each pair includes a public key, safe to use in front-end code since it carries limited permissions by design, and a secret key, which must never appear anywhere a visitor's browser can see it, only ever used from your own server, following the architecture pattern covered in our guide to connecting an API to a website.
The two integration approaches: inline popup versus standard checkout
Paystack offers two main ways to actually collect payment. The inline popup, using Paystack's own JavaScript library embedded in your page, opens a payment form directly over your website without redirecting the customer away, using your public key on the front end to initialise the popup. The standard checkout redirects the customer to a Paystack-hosted payment page and brings them back afterward, initiated from your own server using your secret key. The inline approach feels more seamless to the customer, staying on your site throughout; the standard redirect approach is slightly simpler to implement correctly and keeps even more of the payment page's security entirely on Paystack's own infrastructure. Both are legitimate, well-supported choices, and the right one often comes down to how much control you want over the exact visual experience versus how quickly you want to ship a working integration.
Initialising a transaction: the standard checkout flow
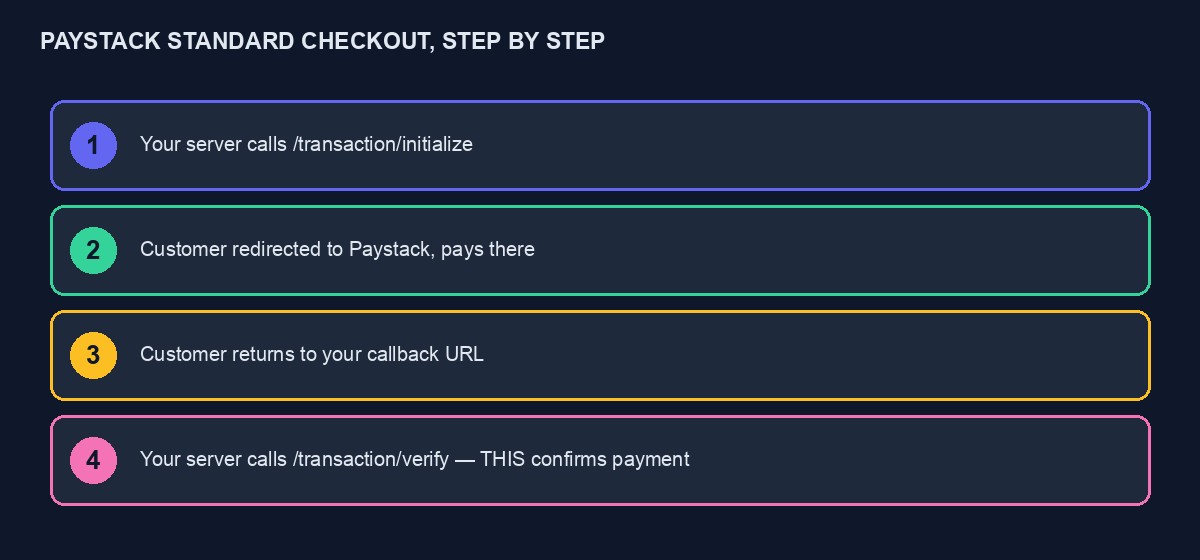
Using standard checkout, your server sends a request to Paystack's /transaction/initialize endpoint, carrying the customer's email, the amount in kobo, Paystack's API works in the smallest currency unit, so five thousand naira is sent as 500000, and your secret key in the Authorization header. Paystack responds with an authorization URL, a link to their hosted payment page, which you redirect the customer to. The customer completes payment there, entering card details or choosing another method, entirely on Paystack's own secure page, and is redirected back to a callback URL you specified, carrying a reference identifying that specific transaction.
The step everyone eventually gets wrong: verifying, not just trusting the redirect
This is the single most important detail in the entire integration, worth its own clearly marked section. When the customer is redirected back to your site after payment, that redirect alone is not proof the payment actually succeeded. A redirect can be interrupted, manipulated, or simply never completed correctly, and treating "the customer landed back on my success page" as sufficient proof of payment is a genuine, exploitable security gap.
The correct approach: take the reference from the callback, and separately, from your own server, call Paystack's /transaction/verify/:reference endpoint, which returns the actual, authoritative status of that specific transaction directly from Paystack's own records. Only mark an order as paid once this verification call explicitly confirms success. This single habit, verify through a direct server-to-server call rather than trusting the redirect, is what separates a genuinely secure integration from one that looks correct in testing and is quietly exploitable in production.
Webhooks: the more reliable confirmation path
Beyond verifying after a redirect, Paystack also sends a webhook, a server-to-server notification, the moment a transaction's status changes, following the general pattern covered in our guide to what a webhook is. This is worth implementing alongside redirect verification, not instead of it, because a webhook will still notify you correctly even in the rare case a customer closes their browser immediately after paying and never actually returns to your callback URL at all.
Paystack signs every webhook payload using your secret key, and your code must verify this signature before trusting anything in the payload, exactly the discipline covered in our general webhook guide. Paystack's documentation specifies the exact signing method, calculating a hash of the raw request body using your secret key and comparing it against the signature sent in the request header; a mismatch means the request did not genuinely come from Paystack and should be discarded without further processing.
A complete, worked example: an order that goes from pending to paid
Picture a customer checking out for an order worth eight thousand naira. Your server creates an order record with status "pending" and a unique reference, then calls /transaction/initialize with that reference, the customer's email, and the amount in kobo, receiving back an authorization URL. The customer is redirected there, pays by card, and is redirected back to your callback URL carrying the reference. Your server immediately calls /transaction/verify/:reference, receives confirmation the payment succeeded, and updates the order to "paid," displaying a confirmation to the customer. Separately, moments earlier or later depending on network timing, Paystack's webhook arrives at your registered webhook endpoint reporting the same transaction's success; your code verifies its signature, checks whether this specific event has already been processed to avoid double-handling, covered in our webhook guide's idempotency section, and if not already marked paid through the redirect verification, marks it paid now. Either path, redirect verification or webhook, reliably gets the order to "paid," and having both means a customer who never returns to your callback page is still correctly recorded as having paid, once the webhook arrives.
Handling failed and declined payments gracefully
A verification call or webhook can also report failure, a declined card, insufficient funds, and your code should handle this as a real, expected case rather than an afterthought: update the order status appropriately, and show the customer a clear, specific message where possible, "your card was declined, please try a different payment method or contact your bank," rather than a generic error that leaves them unsure whether to try again or give up entirely.
Testing properly before going live
Paystack provides test card numbers specifically for triggering different outcomes, a successful payment, a declined payment, a card requiring additional authentication, all documented on their test card page. Work through each of these deliberately in test mode, confirming your code handles every outcome correctly, before ever switching your configuration to live keys. This is worth the discipline of a proper testing pass rather than only testing the single happy path where a payment simply succeeds, since real customers will eventually hit every one of these other cases too.
Subscriptions and recurring charges
For a business needing repeating charges, Paystack's subscription features let a customer authorise a card once, then be charged automatically on a defined schedule afterward, using a plan you configure in your dashboard or through the API. This involves a somewhat different flow from a one-off transaction, since it requires securely storing an authorization reference for future charges rather than only processing a single payment, and Paystack's own documentation on subscriptions and plans is worth reading directly if this applies to your specific business.
Debugging a transaction that "did not work"
A genuinely useful habit before writing a single line of debugging code: every transaction, test or live, appears in your Paystack dashboard with its full detail, the exact request that was sent, the response, and the specific reason for any failure. When a customer reports a problem, or your own testing produces an unexpected result, check the dashboard first, searching by the transaction reference, before assuming the problem is in your own code. This single habit resolves a large share of "it's not working" confusion quickly, because it tells you immediately whether the problem happened on Paystack's side, a declined card, an expired session, or is genuinely something in your own integration code.
If the dashboard shows a transaction that succeeded on Paystack's side but your own system never marked the order as paid, the problem lives specifically in your verification or webhook handling, not in the payment itself, which narrows your debugging considerably: check whether your webhook endpoint is correctly registered in your Paystack dashboard settings, and whether your server-side verify call is actually being triggered and its response correctly interpreted.
Refunds: initiating and handling them properly
Paystack supports initiating a refund through their API or dashboard, either a full or partial amount, and it is worth building a deliberate process around this rather than handling it ad hoc each time: decide your business's actual refund policy in advance, record every refund against the original order in your own system for a clean audit trail, and understand that a refund typically takes a few business days to actually reach the customer's card or account, which is worth communicating clearly to the customer rather than leaving them wondering why a refund confirmation on your end has not yet appeared as money back in their hands.
Split payments and multiple recipients
If your business needs to automatically split a single payment between multiple parties, a marketplace paying out to individual sellers, a platform taking a commission before passing the rest along, Paystack's split payment feature handles this directly, letting you define a split configuration once and have incoming payments divided automatically according to it, rather than collecting the full amount yourself and handling payouts to other parties manually and separately. This is a meaningfully more advanced feature than a simple single-recipient checkout, and it is worth reading Paystack's own documentation on subaccounts and split payments directly if your business model genuinely needs it, rather than trying to approximate the same result with manual transfers.
Currency and international customers
Paystack primarily processes in Nigerian naira, with support for a small number of other African currencies depending on your account's configuration, and settlement into your bank account happens in naira regardless of what currency the original charge was made in, at whatever conversion applies. If a meaningful share of your customers are paying from outside the currencies Paystack directly supports for your account, this is worth checking specifically against your account's actual configuration and against Flutterwave's comparable international support, covered in our Flutterwave API tutorial, before assuming either gateway handles your specific international mix identically.
Metadata: attaching your own information to a transaction
Paystack lets you attach a metadata object to a transaction when you initialise it, arbitrary extra information of your own choosing that comes back attached to that transaction in the verify response and the webhook payload. This is genuinely useful for connecting a Paystack transaction back to your own internal records without needing a separate lookup, attaching your own order ID, a customer identifier, or anything else your system needs to reconcile a payment against your own data model. A common, sensible pattern is attaching your own order reference here even though you also generate Paystack's own transaction reference, since having both makes matching records between the two systems straightforward regardless of which one you are looking at first.
Rate limits and handling high-traffic moments
Like any API, Paystack enforces rate limits to protect their own infrastructure, and a business running a flash sale or a sudden traffic spike should be aware that a burst of simultaneous checkout attempts could, in rare cases, hit a limit. Build your integration to retry a genuinely failed request due to rate limiting after a brief pause rather than immediately showing the customer an error, and if you anticipate unusually high, predictable traffic, a major promotional event, it is worth reaching out to Paystack's support in advance to discuss your expected volume.
Common integration mistakes specific to Paystack
Sending the amount in naira instead of kobo. Forgetting to multiply by a hundred is a classic, easy mistake that results in charging a customer one hundredth of the intended amount, or attempting to charge an absurdly large one if the conversion is applied backward.
Trusting the callback redirect without a server-side verify call. Covered above, and worth repeating because it remains the most consequential mistake in this entire integration.
Forgetting to handle the webhook idempotently. A webhook can legitimately arrive more than once for the same event; make sure processing it twice does not mark an order paid twice or send a duplicate confirmation.
Using live keys during development. Test keys exist specifically so mistakes during development cost nothing real; use them until you are genuinely ready to accept real payments.
A closing checklist before your first live transaction
Test keys replaced with live keys, deliberately and reviewed, not accidentally left over from testing. Signature verification genuinely implemented and tested against a real webhook, not assumed to be working because the code looks correct. Idempotency handling in place for duplicate webhook deliveries. Error states tested deliberately, not just the single happy path. And a first, genuinely live transaction, of your own money, watched closely from initiation through to settlement in your bank account, before directing any real customer traffic at the integration. This short list, run through deliberately rather than assumed complete, catches the overwhelming majority of what would otherwise surface as a painful, live production incident instead.
A short glossary for Paystack's own documentation
Authorization URL: the hosted checkout page link returned by initialize. Reference: the unique identifier tying together your order and Paystack's own transaction record. Subaccount: a mechanism for automatically splitting a payment with another party. Bearer token: the format your secret key takes in the Authorization header of every server-side request. Keeping these few terms straight makes reading Paystack's own documentation directly, which is worth doing before building anything real, considerably faster and less confusing than approaching it entirely cold.
Where this is already built for you
If your goal is simply to accept payments on a store, VTU platform, or booking site rather than to build the integration yourself, our platform already implements everything described above, initialisation, redirect verification, signed webhook handling, idempotency, tested and working, and connecting your own Paystack account is a matter of pasting your keys into your project settings. You can start building free to see this directly, or read our broader guide to accepting online payments in Nigeria for the non-technical overview, and our Flutterwave API tutorial if you are comparing the two gateways directly.


Comments
No comments yet. Be the first to share your thoughts.